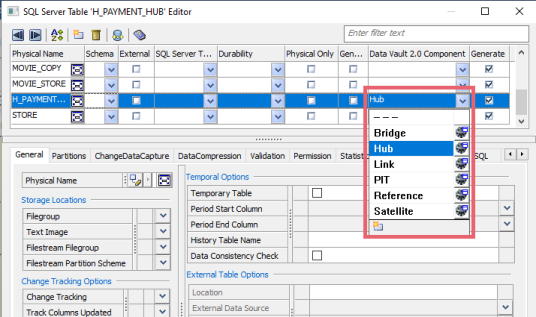
You can convert your model to a data vault model either using the Data Vault components available on the ribbon or via the object editor. Ensure that you have identified business keys, contexts, and relationships before conversion.
To convert models to Data Vault models, follow these steps:
-
Select a table in your model.
For example, in the following image, the PAYMENT table is selected.
Alternatively, right-click a table and open its properties. -
Click the appropriate Data Vault component on the ribbon.
The selected table is converted to the selected Data Vault component type.
For example, after selecting the PAYMENT table, on the ribbon, click Hub. The PAYMENT table is converted to Hub.
Alternatively, in the table editor, set Data Vault 2.0 Component Type.This option is available on the table editor only when the Data Vault 2.0 is enabled for the model.

-
Repeat steps 1 and 2 for the required tables in your model.
Alternatively, you can select multiple tables and set the Data Vault 2.0 Component type on the ribbon. -
Save the model.
If required, you can rollback the model to its earlier state. To rollback, on the Model Editor > General tab, clear the Data Vault 2.0 check box. This restores your model to its earlier state.
You can also create your own component types and associate them with a table in your model. To create a custom component, follow these steps:
-
In the Model Explorer, right-click the Data Vault 2.0 node.
-
Click New.
A custom Data Vault component is added to the list. -
Configure the new component's properties.
|
Copyright © 2023 Quest Software, Inc. |